Export Values From KPIs
With BSC Designer You Can Export Indicator Values, Including
current values, weights, min and max, baseline and target values.
Step 1. Run Export
- Select any indicator.
- Select "Export Values" in "KPIs" menu.
- Follow the "Export" wizard. You will be asked if you wish
to export the whole document or only the selected item.
Step 2. Select items to export
You can export just KPI structure, data for the selected KPI, or for the whole scorecard.
- Export data for the whole document
- Export data for the current item only
- For "Container" indicators you will be able to select if you want to export child items as well
- Choose the output format - MS Excel or CSV
A checkbox "Export indicators without data" allows the creation of an Excel template that one can fill in later and import back into BSC Designer.
Step 3. Select level of detail
BSC Designer supports different detail levels for export:
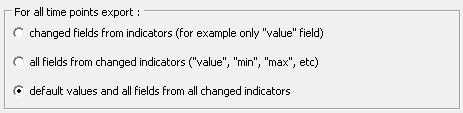
- "Changed fields from indicators" - only changed fields will be
exported. For instance, if the "Min" field was changed, but the "Max"
field was not changed, then BSC Designer will export only the value of
the "Min" field.
- "All fields from changed indicators" - if one of the fields
for the indicator was changed, then the values of all other fields for
this indicator will be exported as well.
- "Default values and all fields..." - with this option BSC
Designer will export all possible values, including default and
inherited values.
- Values for selected dates
Step 4. Select columns to export
For this step select the columns to be exported.
Step 5. Preview
Verify that the displayed data are what you need.
Step 6. Destination file name
Enter the name of the file where the data should be saved. You
can use the .csv extension so that you can open the data in MS Excel.